현재 16개의 숫자를 저장하고 있다.
[1] 이 주소들이 각각 어디에 저장되는지 확인하자.
[2] 어디에 저장하는지 몰라도, max로 저장하자.
오늘은 이 두가지 미션에 대해 클리어를 목표로 해본다.
---
+ 근데 아무리봐도
[1] 디버깅 단계 없이
[2] 로 넘어가는건 근본적인 문제해결이 아니며
말도 안되게 그냥 대충 넘어가는 것으로 느껴진다.
---
[1]
이전에 남겼던 질문이다.
GUI상에서가 아닌 직접 Instantiation을 통해 ILA를 부착시킬 수 있다.
PG172문서와 UG908문서를 참고한다.
https://www.inflearn.com/questions/602972
합성된 이후, 원하는 신호에 대해 ILA처럼 Probe를 하는 방법 - 인프런 | 질문 & 답변
안녕하세요. 강의 너무 재미있고 도움되게 듣고 있습니다. 13강 bram과 관련된 부분에 대해 복습중입니다. 한가지만 짧게 여쭙고 싶습니다. (혹시 답변이 가능하지 않은 범위라면, 괜찮습니다.)
www.inflearn.com
https://docs.xilinx.com/r/en-US/ug908-vivado-programming-debugging/ILA
ILA - 2022.1 English
The Integrated Logic Analyzer (ILA) feature allows you to perform in-system debugging of post-implemented designs on an FPGA, SoC, or Versal® device. This feature should be used when there is a need to monitor signals in the design. You can also use this
docs.xilinx.com

https://docs.xilinx.com/v/u/en-US/pg172-ila
Integrated Logic Analyzer v6.2 Product Guide(PG172) - 6.2 English
docs.xilinx.com


wiring을 어디서 해줘야하지? 문서를 더 읽자.

우선 1차 커스터마이징은 여기서 가능하고.

how to insert post synthesis in the vivado design flow
Creating a Post-Synthesis Project
Step 4: Create a Post Synthesis Project in Vivado IDE
Creating a Post-Synthesis Project - 2022.1 English
A post-synthesis project begins with a synthesized netlist, fully generated block designs, fully generated IP, and corresponding constraints. You can then analyze, floorplan, and implement the design. Note: You can use either XST or third-party synthesis t
docs.xilinx.com
Step 4: Create a Post Synthesis Project in Vivado IDE - 2022.1 English
Add the netlist file created in the previous section. Click Add Files again, navigate to the proj_synplify_netlist/proj_synplify_netlist.runs/synth1 folder and select sinegen.dcp. Add the DCP files created for the sub-module IPs in the previous section. Cl
docs.xilinx.com
어어 내가 원하던 내용을 찾은 기분이야.

Using the Synplify Pro Synthesis Tool and Vivado Design Suite to Debug a Design
This simple tutorial shows how to do the following:
- Create a Synplify Pro project for the wave generator design.
- Mark nets for debug in the Synplify Pro constraints file as well as VHDL source files.
- Synthesize the Synplify Pro project to create an EDIF netlist.
- Create a Vivado® project based on the Synplify Pro netlist.
- Use the Vivado IDE to setup and debug the design from the synthesized design using Synplify Pro.


아 그런데 step4를 바로 하려니깐
post synthesis analysis tool을 함께 활용해서 가는거라
새로운 서비스를 다운받아야 할듯하다. 없이는 못하는듯.

Synplify는 Synthesis도구이다. (이때 Constraints와 관련된 Concept 수립이 중요하다.)
https://blog.daum.net/trts1004/12109110
Synthesis with Synplify
FPGA에서 design을 수행하기 위해서는 먼저 design RTL을 synthesis해야 한다. Synthesis하는 과정은 사용자가 작성한 RTL을 FPGA에 담기위해서 AND, OR, flip-flop, memory와 같은 logic element로 분해하는 과정..
blog.daum.net
http://www.eewebinar.co.kr/xilinx/technical_view.asp?idx=91&g=3
FPGA 디자인, 타이밍 만족이 모든 것!
FPGA 디자인, 타이밍 만족이 모든 것! FPGA 디자인, 타이밍 만족이 모든 것! 2014-11-01 툴이나 디자인 기법은 타이밍 성능 목표를 효율적으로 달성하기 위해 존재하는 것이다. 글 / 앤젤라셔튼(Angela S
www.eewebinar.co.kr
https://www.newswire.co.kr/newsRead.php?no=103662
신플리시티, 래티스사 FPGA전용 ‘신플리파이 프로?(SYNPLIFY PRO?)’ 소프트웨어 출시
서울--(뉴스와이어) 2005년 12월 05일 -- 세계적 반도체 디자인 및 검증 소프트웨어 공급 업체인 신플리시티 (지사장 이석하, www.synplicity.com)는 오늘 인시스템 프로그래머블 로직 디바이스 업체인 래
www.newswire.co.kr
음.
synplify를 다운받는 절차가 매우 복잡한데
이 정도 접근성이면, 무언가 내가 문서를 잘못 보고있을 가능성도 있는듯하다.
개념이 잘못 잡혔던듯.

Add More Debug Nets to the Project
와 관련해서
다른 문서를 찾자.
Using the Netlist Insertion Method to Debug a Design - 2022.1 English
In this lab, you will mark signals for debug in the source HDL as well as the post synthesis netlist. Then you will create an Integrated Logic Analyzer (ILA) core and take the design through implementation. Finally, you will use the Vivado® tool to connec
docs.xilinx.com
Using the Netlist Insertion Method to Debug a Design
In this lab, you will mark signals for debug in the source HDL as well as the post synthesis netlist. Then you will create an Integrated Logic Analyzer (ILA) core and take the design through implementation. Finally, you will use the Vivado® tool to connect to the KC705 target board and debug your design with the Vivado Integrated Logic Analyzer.


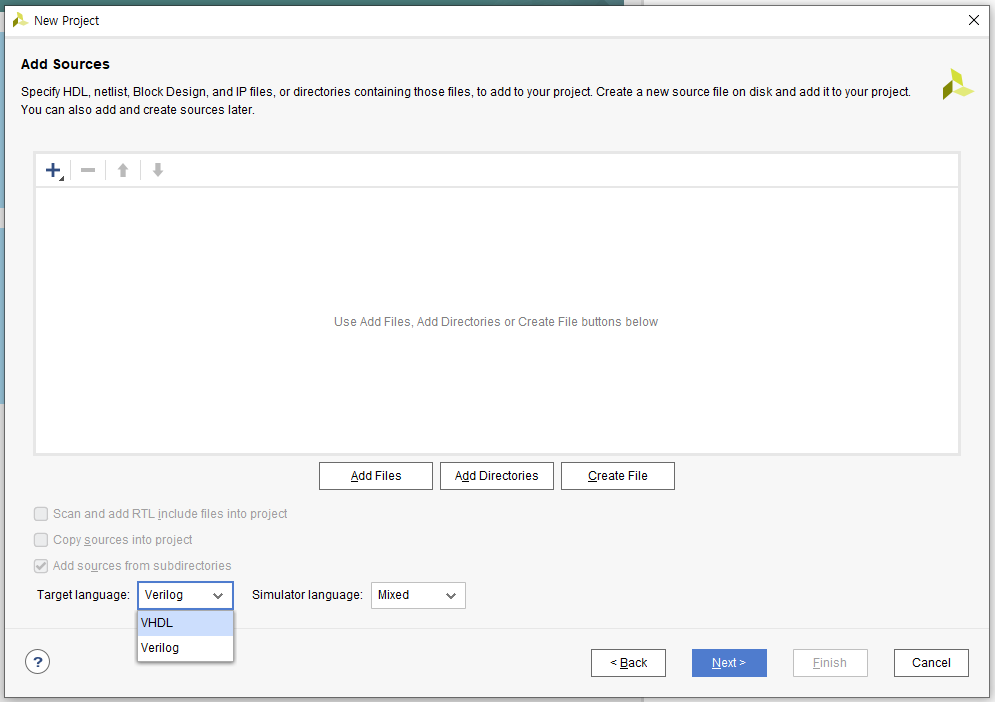
ip폴더에 있는
v파일들을 불러와준다.
(Copy Source into Project 하는 이유 모르고 있음)

sine은 뭐지

시뮬레이션 과정에서 만들어진 freq wave?


우선 모든 폴더 열어봤는데 없고...

자 그래서 sine 파일(또는 디렉토리)을 어떻게 만들어?
어떤 과정에서 생성되었어야 하나?
내가 하고 있는것은 debug workflow 구축에 가깝다.
https://m.blog.naver.com/PostView.naver?isHttpsRedirect=true&blogId=joa_quin&logNo=221164956329
FPGA DDS MIXER (ILA)
오늘은 FPGA DDS와 MIXER로 원하는 주파수를 만들어 내는 것을 포스팅 하려고 합니다~! 먼저 ...
blog.naver.com

디버깅 문서 처음부터 읽기 (母문서)
Revision History - 2021.1 English
The following table shows the revision history for this document. Section Revision Summary 07/14/2021 Version 2021.1 General updates N/A
docs.xilinx.com

아직 내가 큰 사이즈의 프로젝트에 대해
이 튜토리얼 문서만으로 장악해서 다룰 수 있는 수준은 아닌듯하다.
문서에서 제안하는대로
디버깅 튜토리얼을 해보자.
- Invoke the Vivado IDE.
- In the Getting Started page, click Create Project to start the New Project wizard. Click Next.
- In the Project Name page, name the new project proj_netlist and provide the project location (C:/Vivado_Debug). Ensure that Create Project Subdirectory is selected and click Next.
- In the Project Type page, specify the type of project to create as RTL Project. Click Next.
- In the Add Sources page:
- Set Target Language to VHDL.
- Click the “+” sign, and then click Add Files.
- In the Add Source Files dialog box, navigate to the /src/lab1 directory.
- Select all VHD source files, and click OK.
- Verify that the files are added, and Copy Sources into project is selected.
- Click Add.
- In the Add Directories dialog box, navigate to the /src/lab1 directory.
- Select sine_high, sine_low, and sine_mid directories and click Select.
- Verify that the directories are added. Click Next.
- In the Add Constraints dialog box, click the “+” sign, and then click Add Files.
- Navigate to /src/lab1 directory and select sinegen_demo_kc705.xdc. Click Next.
- In the Default Part dialog box, specify the xc7k325tffg900-2 part for the KC705 platform. You can also select Boards and then select Kintex-7 KC705 Evaluation Platform. Click Next.
- Review the New Project Summary page. Verify that the data appears as expected, per the steps above, and click Finish.
Note: It could take a moment for the project to initialize.

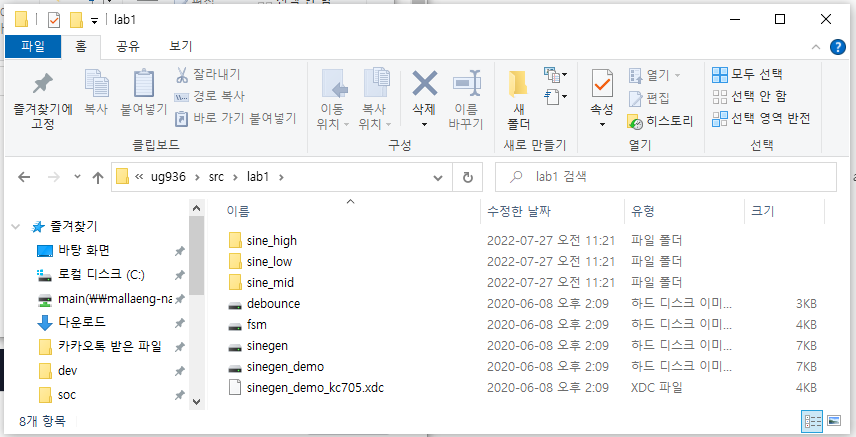


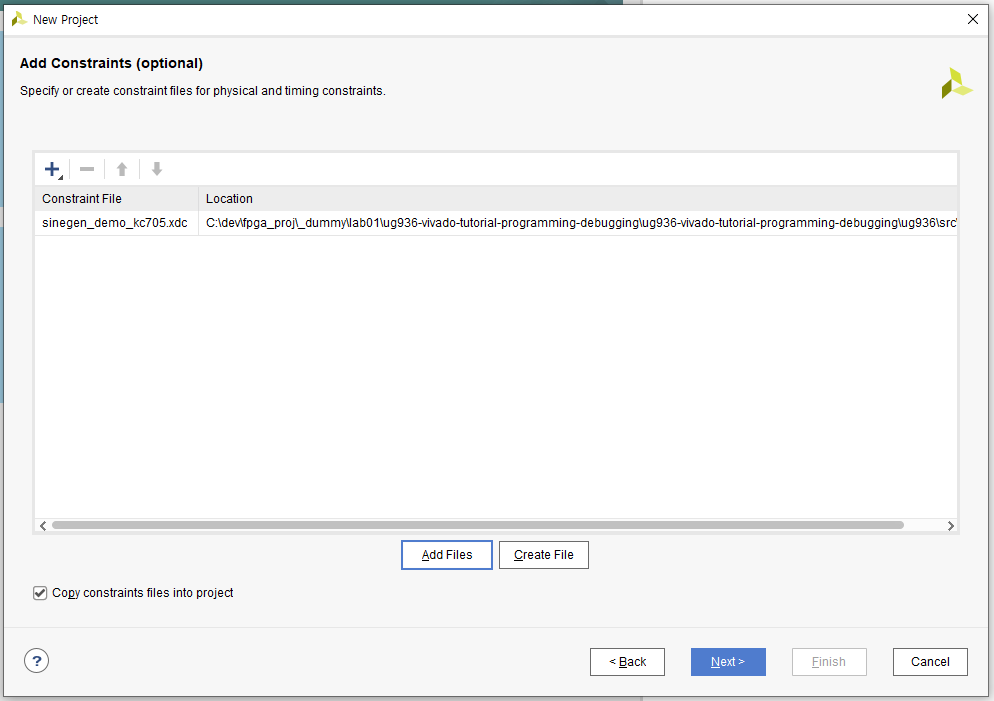

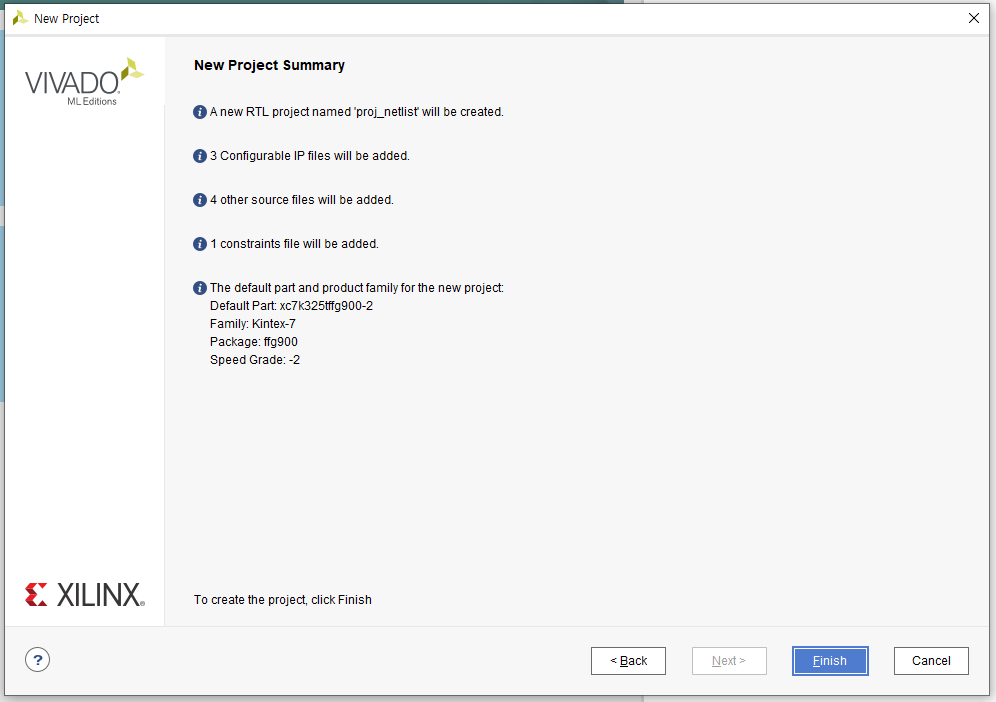
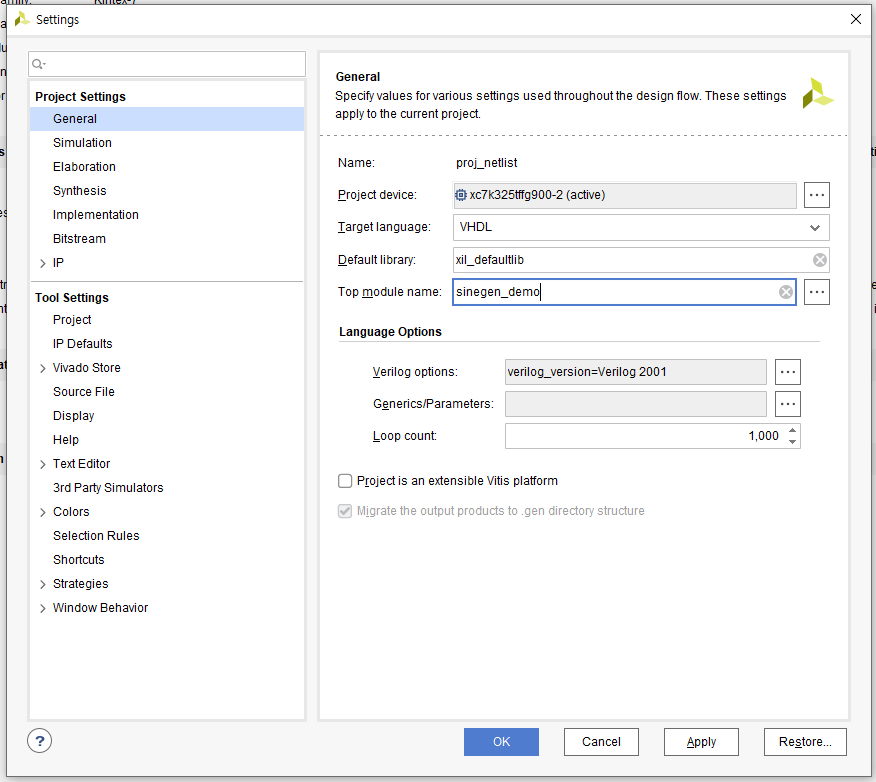


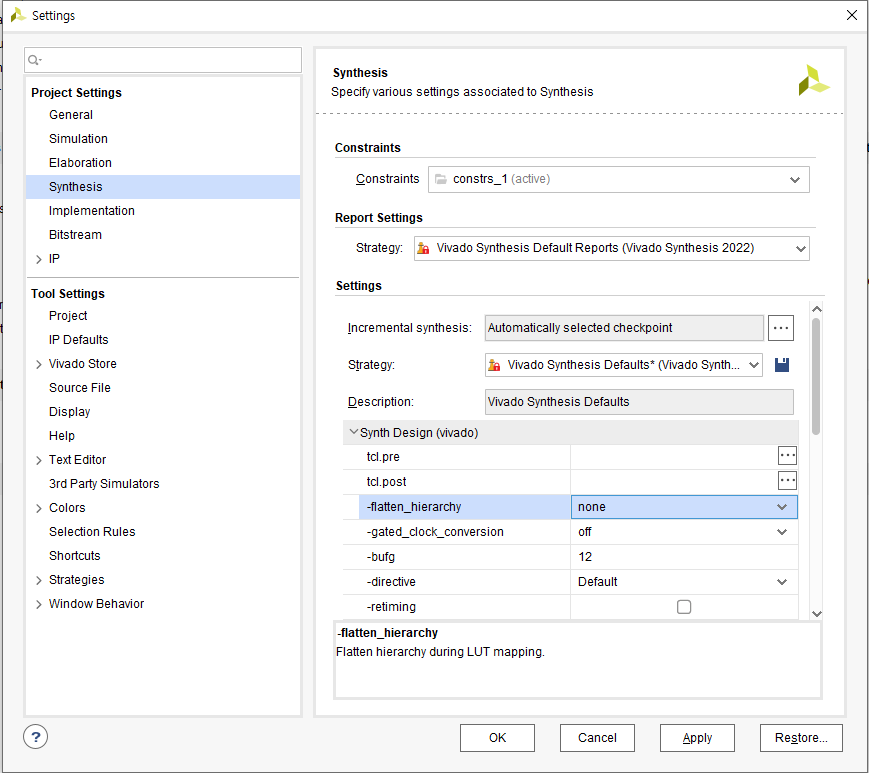

가이드대로 잘 했는데 안된다.
메시지를 읽자.
vivado 2022.1 ver이라서 FLEX 11.17.2.0 versions를 통해서 직접 license upgrade를 해주어야하나.
[Common 17-345] A valid license was not found for feature 'Synthesis' and/or device 'xc7k325t'. Please run the Vivado License Manager for assistance in determining
which features and devices are licensed for your system.
Resolution: Check the status of your licenses in the Vivado License Manager. For debug help search Xilinx Support for "Licensing FAQ". If you are using a license server, verify that the license server is up and running a version of the xilinx daemon that is compatible with the version of Xilinx software that you are using. Note: Vivado 2021.1 and later versions require upgrading your license server tools to the Flex 11.17.2.0 versions. Please confirm with your license admin that the correct version of the license server tools are installed.
https://support.xilinx.com/s/article/76517?language=en_US
76517 - License management tool upgraded to Flexlm 11.17.2.0
Starting with the Vivado 2021.1 release, the License management tool will be upgraded to Flexlm 11.17.2.0. Customers that are using floating licenses must upgrade the licensing utilities to Flexlm 11.17.2.0. New licensing utilities will be available to dow
support.xilinx.com


Operating System (OS) support for Licensing Utilities:
-Windows 10.0 Pro: 64-bit
-Windows Server 2016
-Windows Server 2019
-Red Hat Enterprise Linux 7.4 to 7.9: 64-bit
-Red Hat Enterprise Linux 8.1 to 8.3: 64-bit
-CentOS Linux 7.4 to 7.9: 64-bit
-CentOS Linux 8.1 to 8.2: 64-bit
-SUSE Enterprise Linux 12.4: 64-bit
-SUSE Enterprise Linux 15.2: 64-bit
-Ubuntu Linux 16.04 LTS: 64-bit
-Ubuntu Linux 18.04 LTS: 64-bit
-Ubuntu Linux 20.04 LTS: 64-bit
Setting up a new license server:
1. Download the appropriate Xilinx FLEXnet license utilities for your server's operating system from the Xilinx Download Center at Downloads.
2. Unzip these utilities into a destination directory. Xilinx recommends you place this directory into your application search path.
3. After the FLEXnet utilities are installed, run the following commands to start the floating license server:
a. Linux:
<Server Tool directory>/lnx64.o/lmgrd.sh -c <path_to_license>/<license_file>.lic -l <path_to_license>/<log_filename>.log
b. Windows:
<Server Tool directory>\win64.o\lmgrd -c <path_to_license>\<license_filename>.lic -l <path_to_license>\<log_filename>.log
Existing license server serving certificate-based license:
For existing FLEXnet license servers serving certificate-based licenses, a common practice is to copy the contents of the license file, mailed from xilinx.notification@entitlenow.com, into the existing license file on your FLEXnet server.
Note: Restart the floating license server to ensure the new Xilinx licenses are enabled.
윈도우 서버툴 2019를 사용해야 하는데
이 툴은 또 뭐지?
(아닌가 안 써도 되는건가?)
원격 서버 관리 도구 - Windows Server
이 문서에서는 Windows용 원격 서버 관리 도구에서 사용할 수 있는 도구에 대해 설명합니다.
docs.microsoft.com
소개
Windows Home 또는 Standard Edition을 실행하는 컴퓨터에는 RSAT를 설치할 수 없습니다. RSAT는 Windows 클라이언트 운영 체제의 Professional Edition 또는 Enterprise Edition에만 설치할 수 있습니다. 다운로드 페이지에서 RSAT가 베타, 미리 보기 또는 기타 Windows 시험판 버전에 적용된다고 특별히 명시하지 않는 한 RSAT를 설치하고 사용하려면 Windows 운영 체제의 전체(RTM) 릴리스를 실행해야 합니다. 일부 사용자는 RSAT MSU를 수동으로 해독하거나 해킹하여 지원되지 않는 Windows 릴리스 또는 버전에 RSAT를 설치하는 방법을 알아내었습니다. 이러한 행동은 Windows 최종 사용자 라이선스 계약 위반입니다.
RSAT를 설치하는 것은 Windows 2000 기반 또는 Windows XP 기반 클라이언트 컴퓨터에 Adminpak.msi를 설치하는 것과 비슷합니다. 그러나 한 가지 주요 차이점이 있습니다. Windows 7에서는 RSAT를 다운로드하여 설치한 후에 도구를 자동으로 사용할 수 없다는 점입니다. 제어판을 사용하여 사용할 도구를 사용하도록 설정하세요. 도구를 사용하도록 설정하려면 시작 을 클릭하고, 제어판 을 클릭한 다음 프로그램 및 기능 을 클릭하고 Windows 기능 켜기/끄기 를 클릭합니다.
Windows 10용 RSAT 릴리스에서 도구는 모두 기본적으로 사용하도록 설정됩니다. Windows 기능 켜기/끄기 를 열어 원하지 않는 도구를 사용하지 않도록 설정할 수 있습니다.
window server tool 까지는 안써도 되는데
적어도 home은 아니고 pro이어야 한다.


아 정말 windows 포맷을 다시한번 하긴 정말 싫은데
이 쪽단의 환경설정 너무 어렵다 ㅠ_ㅠ
'적극적 생각 > FPGA' 카테고리의 다른 글
| FPGA를 통한 DDR3 SDRAM 구동 (0) | 2022.07.27 |
|---|---|
| xilinx 포지셔닝 (0) | 2022.07.27 |
| 이더넷 통신 (0) | 2022.07.24 |
| USB 버전별 데이터 전송속도 비교, USB 2.0 3.0 그리고 AWG (0) | 2022.07.24 |
| 구매할 것 (0) | 2022.07.24 |